Category Archives: Code

View Debugging in Xcode 6 causes Mac to crash

I feel like I always start new posts now with.. I’ve been busy… It’s been a while since I’ve posted.. I’ve had a lot on… etc and this post is no different. I’ve been working on a bunch of projects lately both sound and programming related that have been keeping me very busy.
Although it is probably quite specific issue I thought I would post this just incase anyone else was having the same troubles. I’ve started using Xcode 6 and was very excited about using the view debugging tools that let you view your view hierarchy of your app in 3d to inspect your view elements. This is great if your loading some or all of your view programmatically and using the layoutSubviews in your view classes and things are working the way that you expected.

The problem for me was that when ever I tried to use this feature my Mac would freeze for a second and then reboot which was a little frustrating. Turns out this was a fault with the geforce 330M graphics card in mid 2010 Mac pros. Since it’s now 2014 and Apple will only replace this 3 years after the issue was discovered I don’t think I’ll be able to it fixed. Luckily found a little app called gfxCardStatus while allows you to lock your system to using the integrated GPU. After doing this BAM it worked perfectly!

You can download gfxCardStatus here: http://gfx.io/


Batch Convert WAV to a-law or u-law on a Mac

So I’ve been having to do a few conversions of WAV files for old phone systems that require either u-law or a-law encoded audio a bit lately. I’ve been using sox in terminal but decided I need to speed things up a little so decided to create a shell script to process the audio.

On a Mac with this simple script all you need to do is to dowload SoX and put the sox folder at the base level of your filesystem (on your mac HD) at /sox. You can change this in the script by altering the soxloc=”/sox/sox”; line

Then all you need to do is open the Terminal and first drag the script on to the window. Then just drag the folder that contains all the audio files and hit enter.

The script will start looping through the files and converting each one.

You can change any of the parameters like sample rate or encoding just by altering the “-r 8000 -c 1 -e u-law” part

#! /bin/sh

soxloc="/sox/sox";
tempfile="";
echo "WAV to u-law converter script by Sandy Milne V1" 

shopt -s nullglob
for f in "$1"/*.wav
do
	echo "Processing - $f"
	
	
	"$soxloc" "$f" -r 8000 -c 1 -e u-law "${f%.*}"-ulaw.wav
	
        
done

You can download the script here: convert-to-u-law.sh.zip

Hope it’s useful.

shouldPerformSegueWithIdentifier and prepareForSegue in iOS 6

The prepareForSegue method is called just before a segue is performed and allows you to pass variables to the new view controller that is the segue’s destination.

While the prepareForSegue for segue call hasn’t changed between iOS 5 and iOS 6 there has been a new method, shouldPerformSegueWithIdentifier, that has been introduced in iOS 6 which allows you to specify if you want the segue to be be performed or not.. It’s very useful especially for things like only displaying one popover at a time
I’ve included an example of how to to use it below:

-(void) prepareForSegue:(UIStoryboardPopoverSegue *)segue sender:(id)sender
{
    if ([[segue identifier] isEqualToString:@"Next View"]) {
      
        //The segue is to the a View Controller called NextViewController
        (NextViewController *nvc =  (NextViewController  *) segue.destinationViewController;
       
       //Set properties in the view controller - note the views outlets are not set yet
        nvc.stringProperty1 = @"This Is Property 1";
      
         nvc.property2 = @"This Is Property 2";
       //Set self as the delegate
       nvc.delegate = self;
    }
}

- (BOOL)shouldPerformSegueWithIdentifier:(NSString *)identifier sender:(id)sender {


        if ([identifier isEqualToString:@"Crazy View" ]) {
           
            return NO;
      }


        return YES;
        
    }


}


Instantiate a View Controller from a Storyboard in IOS

In a lot of the iOS example projects that Apple provides, such as the scrollview paging example, view controllers are Instantiated from an xib file and not from a storyboard which was introduced in iOS 5.
Instantiating a view controller with a story board is quiet easy you just have to specify the name of the storyboard, ie MainStoryBoard_iPhone without the .storyboard and make sure that you have set the identifier of the view controller that you want to instantiate.
Below is a short example:

UIStoryboard *storyboard = [UIStoryboard storyboardWithName:@"MainStoryboard" bundle:nil];

MonkeyViewController mkvc = [storyboard instantiateViewControllerWithIdentifier:@"monkeyView"];

you can then add the view to a scrollView using something like:
[self.scrollView addSubview:mkvc.view];

Using sox to convert WAV files to a-law or u-law for IVR

Often I have to convert wav files to different and quite esoteric formats that can be used with IVR (Interactive voice response) and Phone systems of clients.
Most formats you can mix directly out of Pro Tools, or your DAW of choice, but sometimes I have to encode files as u-law, a-law or gsm which Pro Tools can’t do.
Do do this I use a handy command line tool for the Mac (it works on windows and linux as well) called SoX
http://sox.sourceforge.net/

Once you’ve downloaded the zip file you and extracted it you should have a folder called “sox-14.4.0” where 14.4.0 is the version number.
What I normally do is rename the folder simply “sox” and move it to my home folder. From here open the terminal (found in Applications->Utilities) and you can simply drag the executable file called sox on to the terminal window. Find the file you wish to covert and drag that on to the terminal window. This will then show the path on your system to the file to be converted. Then to create a 8000 kHz mono a-law encoded file type:

-r 8000 -c 1 -e a-law

or for u-law

-r 8000 -c 1 -e u-law

or gsm

-r 8000 -c 1 -e gsm

After this drag the folder where you want the file to end up, add a slash / and type the name of the output file ie /one-two-three-alaw.wav then hit enter and BOOM… you can use the time while it’s converting to practice pretending you don’t mind creating such low quality files…

The whole things should end up something like this:

/Users/homedir/sox/sox/ Users/homedir/audio-files/one-two-three.wav -r 8000 -c 1 -e a-law Users/homedir/audio-files/one-two-three-alaw.wav

SoX can do a lot more than this so it’s worth checking out the documentation at the SoX website.

Kontakt Scripting Tools

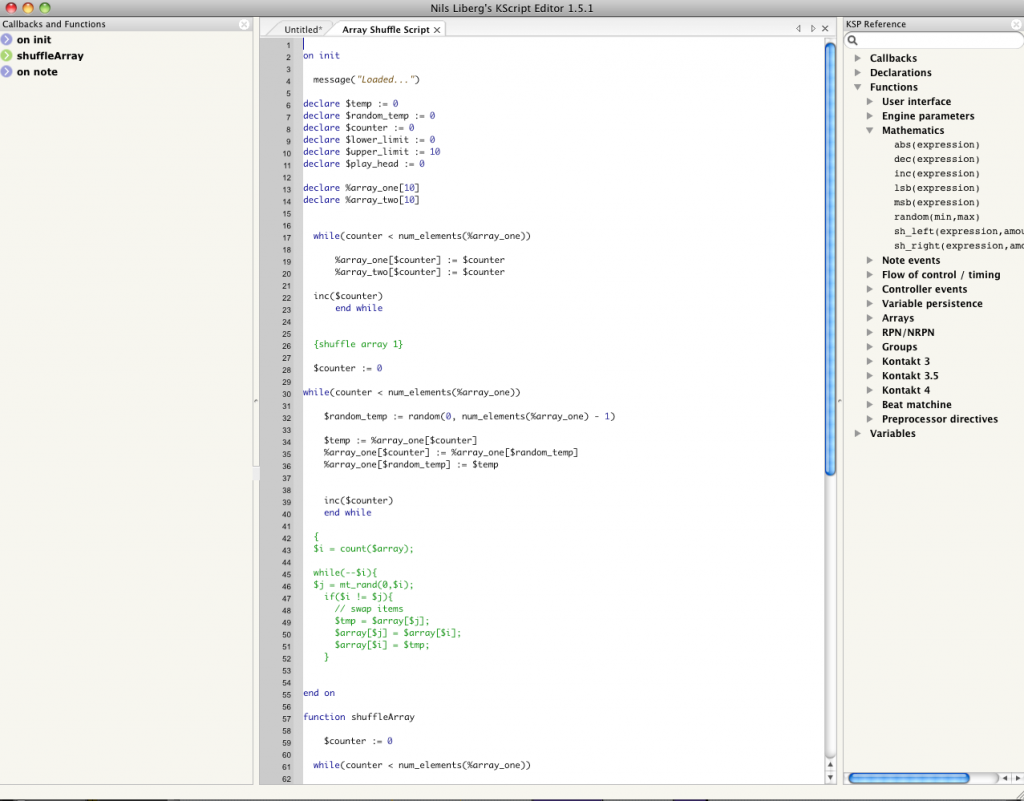
I’ve been doing a lot of work lately within Native Instruments’ Kontakt sampler which has its own scripting language. It’s quite powerful, works in pro tools and other DAWs and means you don’t have to worry about the pitfalls of dealing with Core audio and all that fun.
I thought I would share a couple of the tools that I find indispensable for working with Kontakt scripting.

Nils Liberg’s KScript Editor is a script editor (you probably guessed that part) with an integrated compiler and is a lot easier to work in that typing your code directly into the Kontakt scripting engine. By pressing F5 you can compile your code which is also copied to the clipboard to be pasted into Knotakt. It makes life so much easier.
You can download it from Nil’s website below
http://nilsliberg.se/ksp/

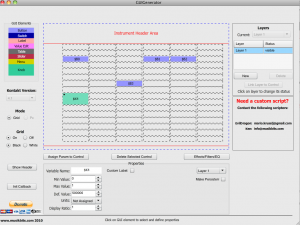
Ken’s GUIGenerator is a graphic tool to help you to create Kontakt performance views, or user interfaces, without having to code at all. It has a lot of great features and lets you name all your variables so you can easily hook them up to your script.
You can download it from musikbits below
http://www.musikbits.com/

Playing a Random Set of Samples in Kontakt

For a project I am working on at the moment I am using Native Instruments Kontakt’s scripting language (KSP) to trigger random samples from a range within the sampler using the script I posted in a previous post. (Here)
This was all working well but when the sample size was getting to small the script was getting locked in a while loop trying to find notes that it had not used before which was very inefficient.
The solution I came up with was to use an array to store all the notes which gets shuffled randomly whenever it reaches the sample limit.
Below is an example of the script I created.

on init
  
  message("Loaded...")
  
declare $temp := 0
declare $random_temp := 0
declare $counter := 0
declare $lower_limit := 0
declare $upper_limit := 10  
declare $play_head := 0

declare %array_one[10]


  while($counter < num_elements(%array_one))
      
      %array_one[$counter] := $counter
      
  inc($counter)
      end while
  
  
  {shuffle array 1}
  
  $counter := 0
  
while($counter < num_elements(%array_one))
    
    $random_temp := random(0, num_elements(%array_one) - 1)
    
    $temp := %array_one[$counter]
    %array_one[$counter] := %array_one[$random_temp]
    %array_one[$random_temp] := $temp
    
    
    inc($counter)
    end while


end on

function shuffleArray
   
    $counter := 0
    
  while($counter < num_elements(%array_one))
    
    $random_temp := random(0, num_elements(%array_one) - 1)
    
    $temp := %array_one[$counter]
    %array_one[$counter] := %array_one[$random_temp]
    %array_one[$random_temp] := $temp
    
    
    inc($counter)
    end while  


end function


on note
    
if ($play_head < 10) 
message("Playing....")    
play_note(%array_one[$play_head],100,0,-0)
inc($play_head)

else 
message("Shuffle....") 
call shuffleArray
$play_head := 0
play_note(%array_one[$play_head],100,0,-0)
inc($play_head)

end if    
    
    
end on

Aussie Lingo Audio Companion – (Australian Slang Dictionary with Audio)

I am about to release a new version of Aussie Lingo Audio Companion – (Australian Slang Dictionary with Audio) in the next couple of days. This update will slightly update the iPhone interface to make it more user friendly, add a suggest button to be able to suggest new lingo straight from the main screen of the iPad and iPhone version, update with 15 or so new bits of lingo and add a button which will open the new Facebook page….

Which brings me to the great segue of…. the new face book page!
https://www.facebook.com/AussieLingoAudioCompanion

If your wandering around Facebook and need something to “like” it’s just sitting there… waiting…

Thanks to everyone who has already liked it. Once again if you want to check out the details or some audio samples head to or use the menu above!

How to create an NSDictionary from a plist file

In a new iPhone app I am currently developing I needed to be able to import the data from a plist file (apple’s XML formatted file) stored within the app bundle and display it in my app. Luckily there is a very handy class method in the NSDictionary class which enables you to create a Dictionary (basically an array with key values) from a file.
NSDictionary *dict = [NSDictionary dictionaryWithContentsOfFile:file];

As I wanted to be able to iterate through all the values in the plist, I created a main dictionary named “database” then within that an array which stored another dictionary that holds my key based data.

This is the code I used to open the plist file and iterate though all the values it contains:

NSString *file = [[NSBundle mainBundle] pathForResource:@"list_of_dogs" ofType:@"plist"];
        NSDictionary *dict = [NSDictionary dictionaryWithContentsOfFile:file];
        
        NSArray *dogArray = [[NSArray alloc] initWithArray:[dict objectForKey:@"database"]];
        
        
        for (NSDictionary *sectionDict in dogArray){
          
            //loop through the data from the plist
            
            
           NSLog(@"Dog Name = %@ ",[sectionDict objectForKey:@"dog_name"]);   
           NSLog(@"Dog Type = %@ ",[sectionDict objectForKey:@"dog_type"]);  


        }

This is the XML format of the plist file I created:

<?xml version="1.0" encoding="UTF-8"?>
<!DOCTYPE plist PUBLIC "-//Apple//DTD PLIST 1.0//EN" "http://www.apple.com/DTDs/PropertyList-1.0.dtd">
<plist version="1.0">
<dict>
	<key>database</key>
	<array>
		<dict>
			<key>dog_name</key>
			<string>Jasper</string>
			<key>dog_type</key>
			<string>Great Dane</string>
			
		</dict>
		<dict>
			<key>dog_name</key>
			<string>Samd</string>
			<key>dog_type</key>
			<string>Jack Russell</string>
			
		</dict>
	</array>
</dict>
</plist>

Any questions? hit me up in the comments

Change the background colour of UITableViewCell

In one of the IOS apps I am currently working on I been using a table view controller to display information for a core data database.  I was wanting to change the background colour of the UITableCell depending on a boolean variable in my manged objects.

Originally I tried setting this in the UITableView delegate method

- (UITableViewCell *)tableView:(UITableView *)tableView cellForRowAtIndexPath:(NSIndexPath *)indexPath

After I quick test I realised that because the UITableViewCell is effectively recycled (de-cued and used again) this approach was not going to work.

After a little more reading I found the UITableView delegate method

-(void)tableView:(UITableView *)tableView willDisplayCell:(UITableViewCell *)cell forRowAtIndexPath:(NSIndexPath *)indexPath

This is what you need to use if you want to change a cell that is displaying a specific row (index path) in your table.

Here is an example of the code I used in my app:


-(void)tableView:(UITableView *)tableView willDisplayCell:(UITableViewCell *)cell forRowAtIndexPath:(NSIndexPath *)indexPath
{
    MonkeyManagedObject *monkey = [self.fetchedResultsController objectAtIndexPath:indexPath];
    
    
    if ([monkey.hasBanana isEqualToNumber:[NSNumber numberWithBool:YES]] ) {
        
        cell.backgroundColor = [UIColor redColor];


    } else {
        
        
        cell.backgroundColor = [UIColor whiteColor];        
    }


}

In my code I am using a NSFetchedResultsController to populate my table view also because the Boolean type in a managed object is actually an NSNumber you need to use the NSNumber class method:

[NSNumber numberWithBool:YES]